How to Ship Production Ready Code with AI Assistance
The RePPIT framework by Mihail Eric
This article is based on a guest lecture given by Mihail Eric in our course and summarized by Aiza Hasib. Mihail Eric is Head of AI at Monaco and a lecturer at Stanford.
Most people trying to ship production code with AI assistance hit a ceiling early. They open a coding harness, describe what they want, accept what the LLM gives them, and ship it. This is what the traditional vibe coding workflow looks like and it confuses expectations for what we can get out of AI in software development. While the models have gotten better, in their current state there is still a limit you hit and that shows up fastest with codebases at scale, legacy codebases, and derivative dialects of languages like C. Vibe coding in its most vanilla form is not going to work there. However, if you use the right methodology, you can realistically write production quality code 2-3X faster.
You might also see people throw out bigger numbers like 10X but that starts testing the limits of human psychology and the bottleneck there isn’t model capability. It is how fast a developer can actually read, decide, and course-correct without losing the thread, and we don’t have a great answer for that yet. There are a handful of principles that, applied in order, can consistently get you 2-3X, with genuinely strong production code.
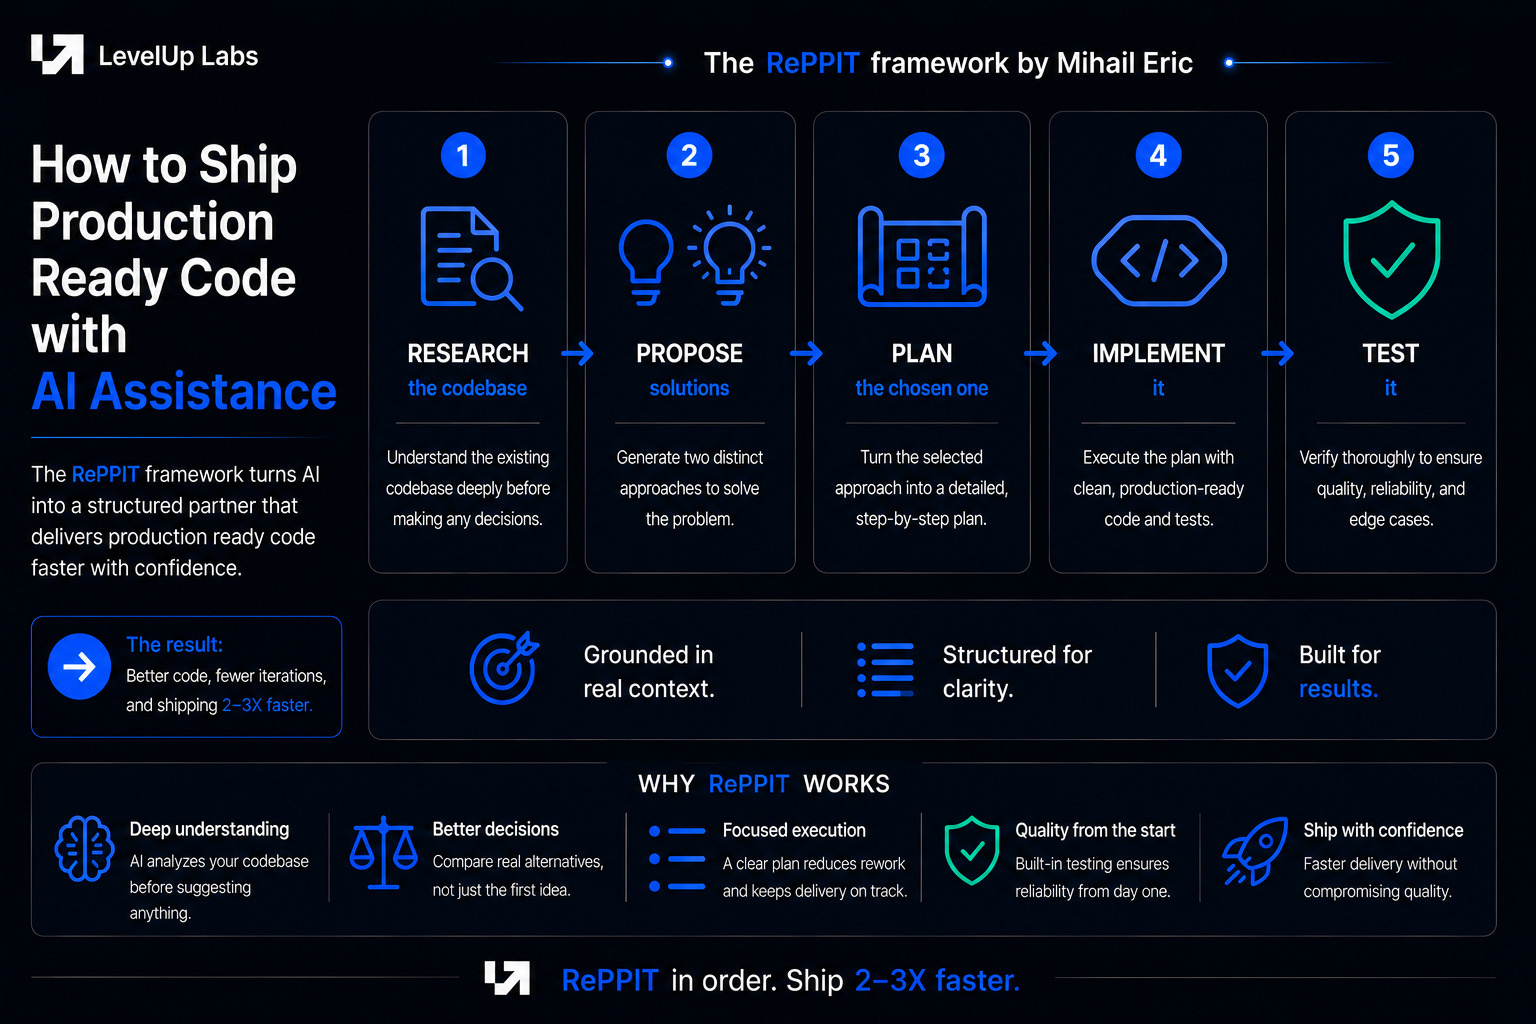
The methodology that can get you there is a framework called RePPIT, with the five steps being Research the codebase, Propose solutions, Plan the chosen one, Implement it, and Test it. None of these are new. Developers have been doing these in some form since long before AI coding existed. What is new is codifying each of them as a prompt and running them in sequence, so the LLM does the legwork while staying grounded in real context at every step.
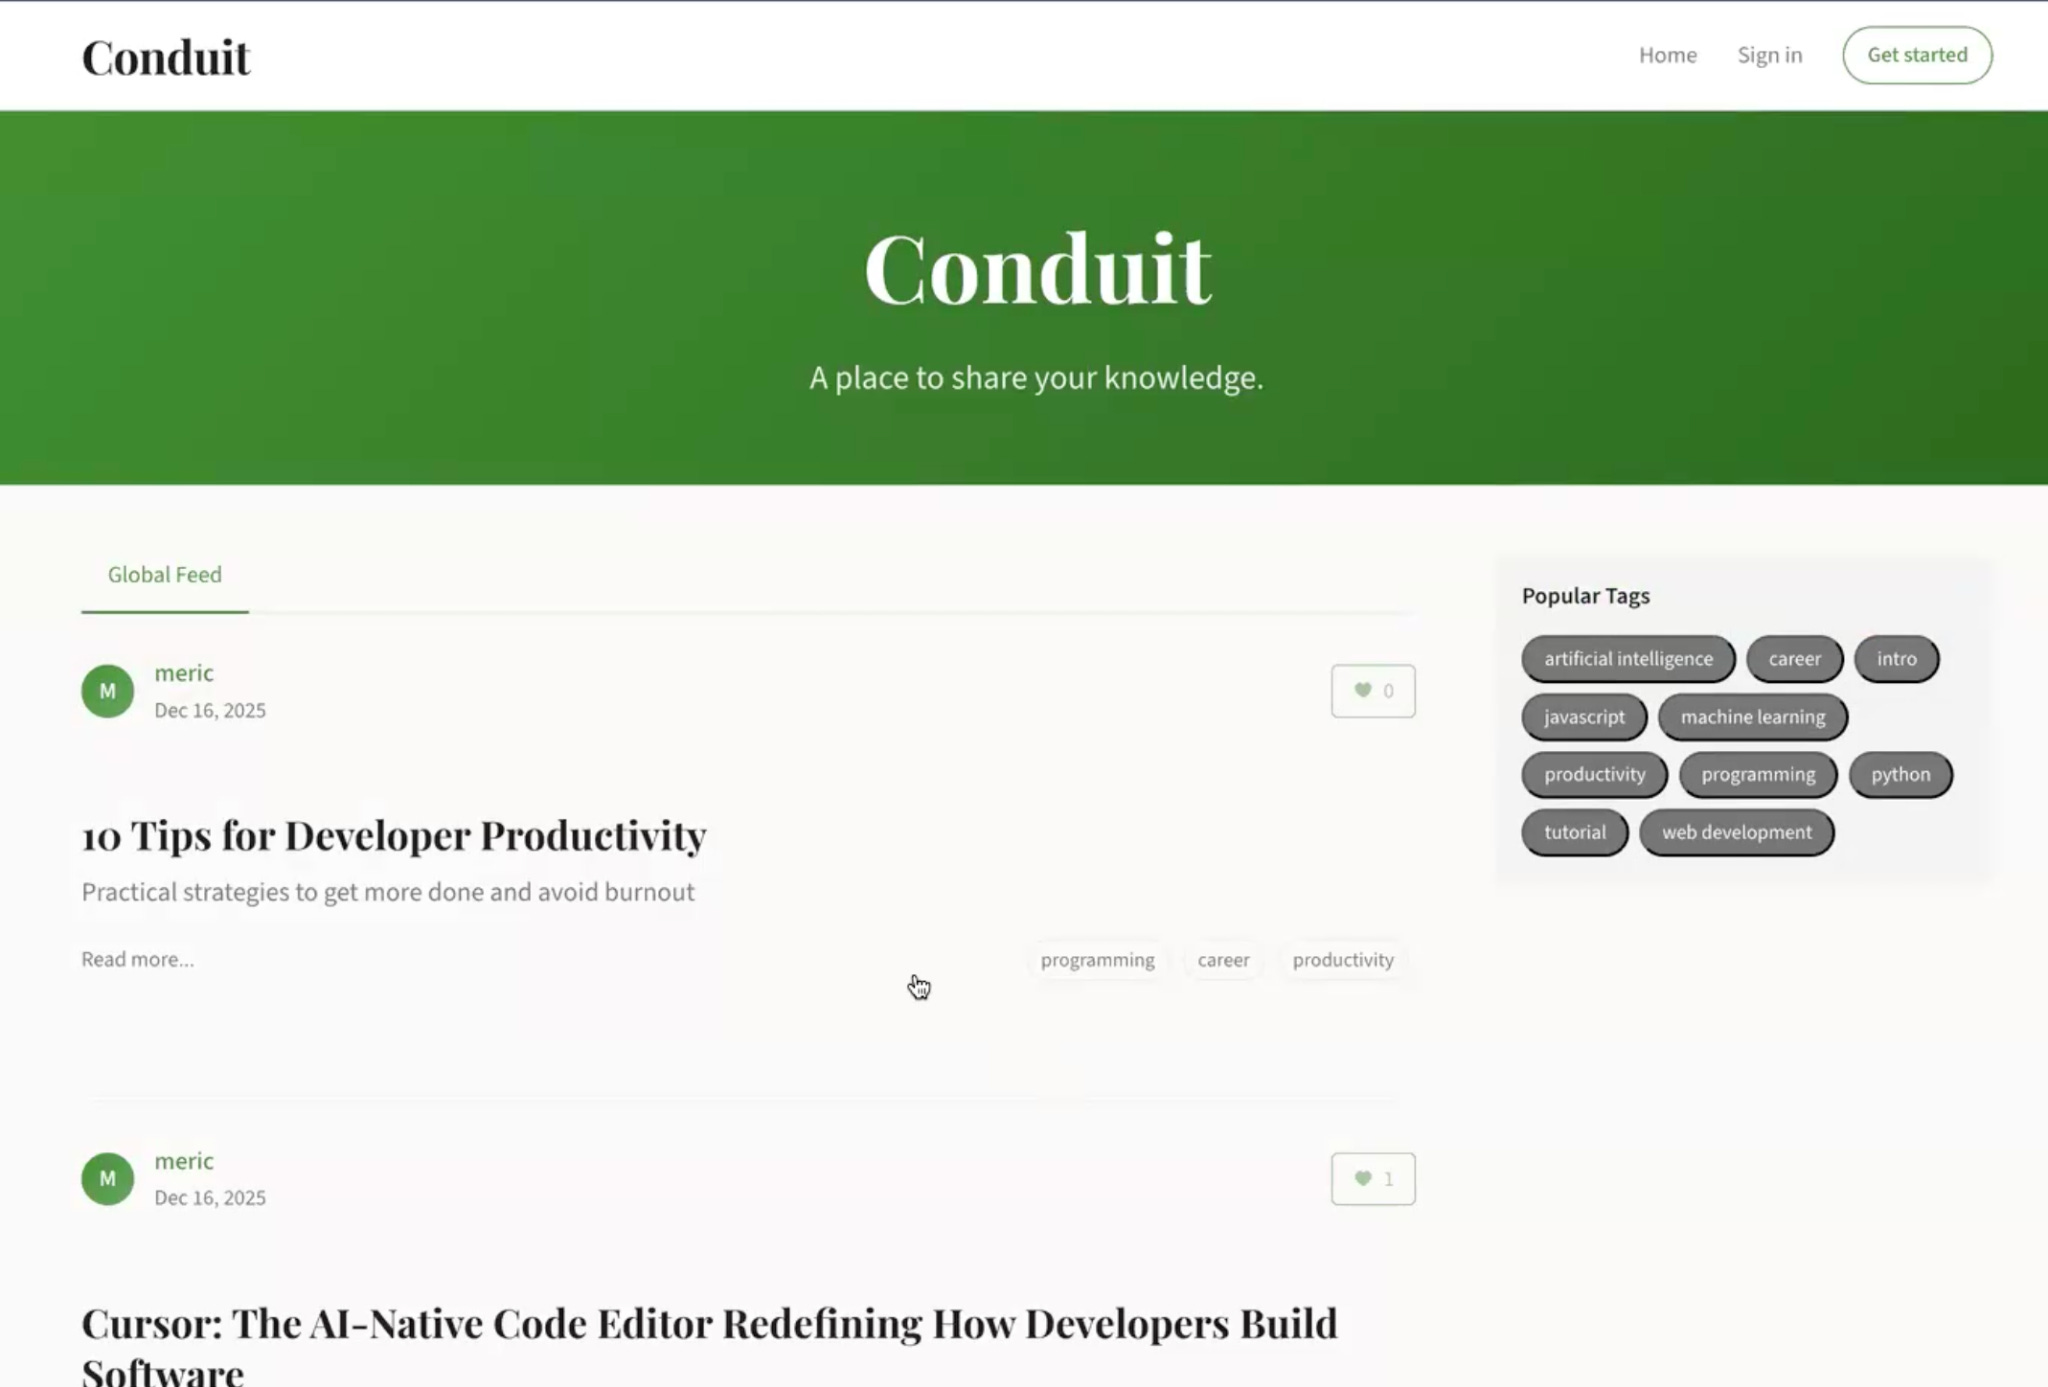
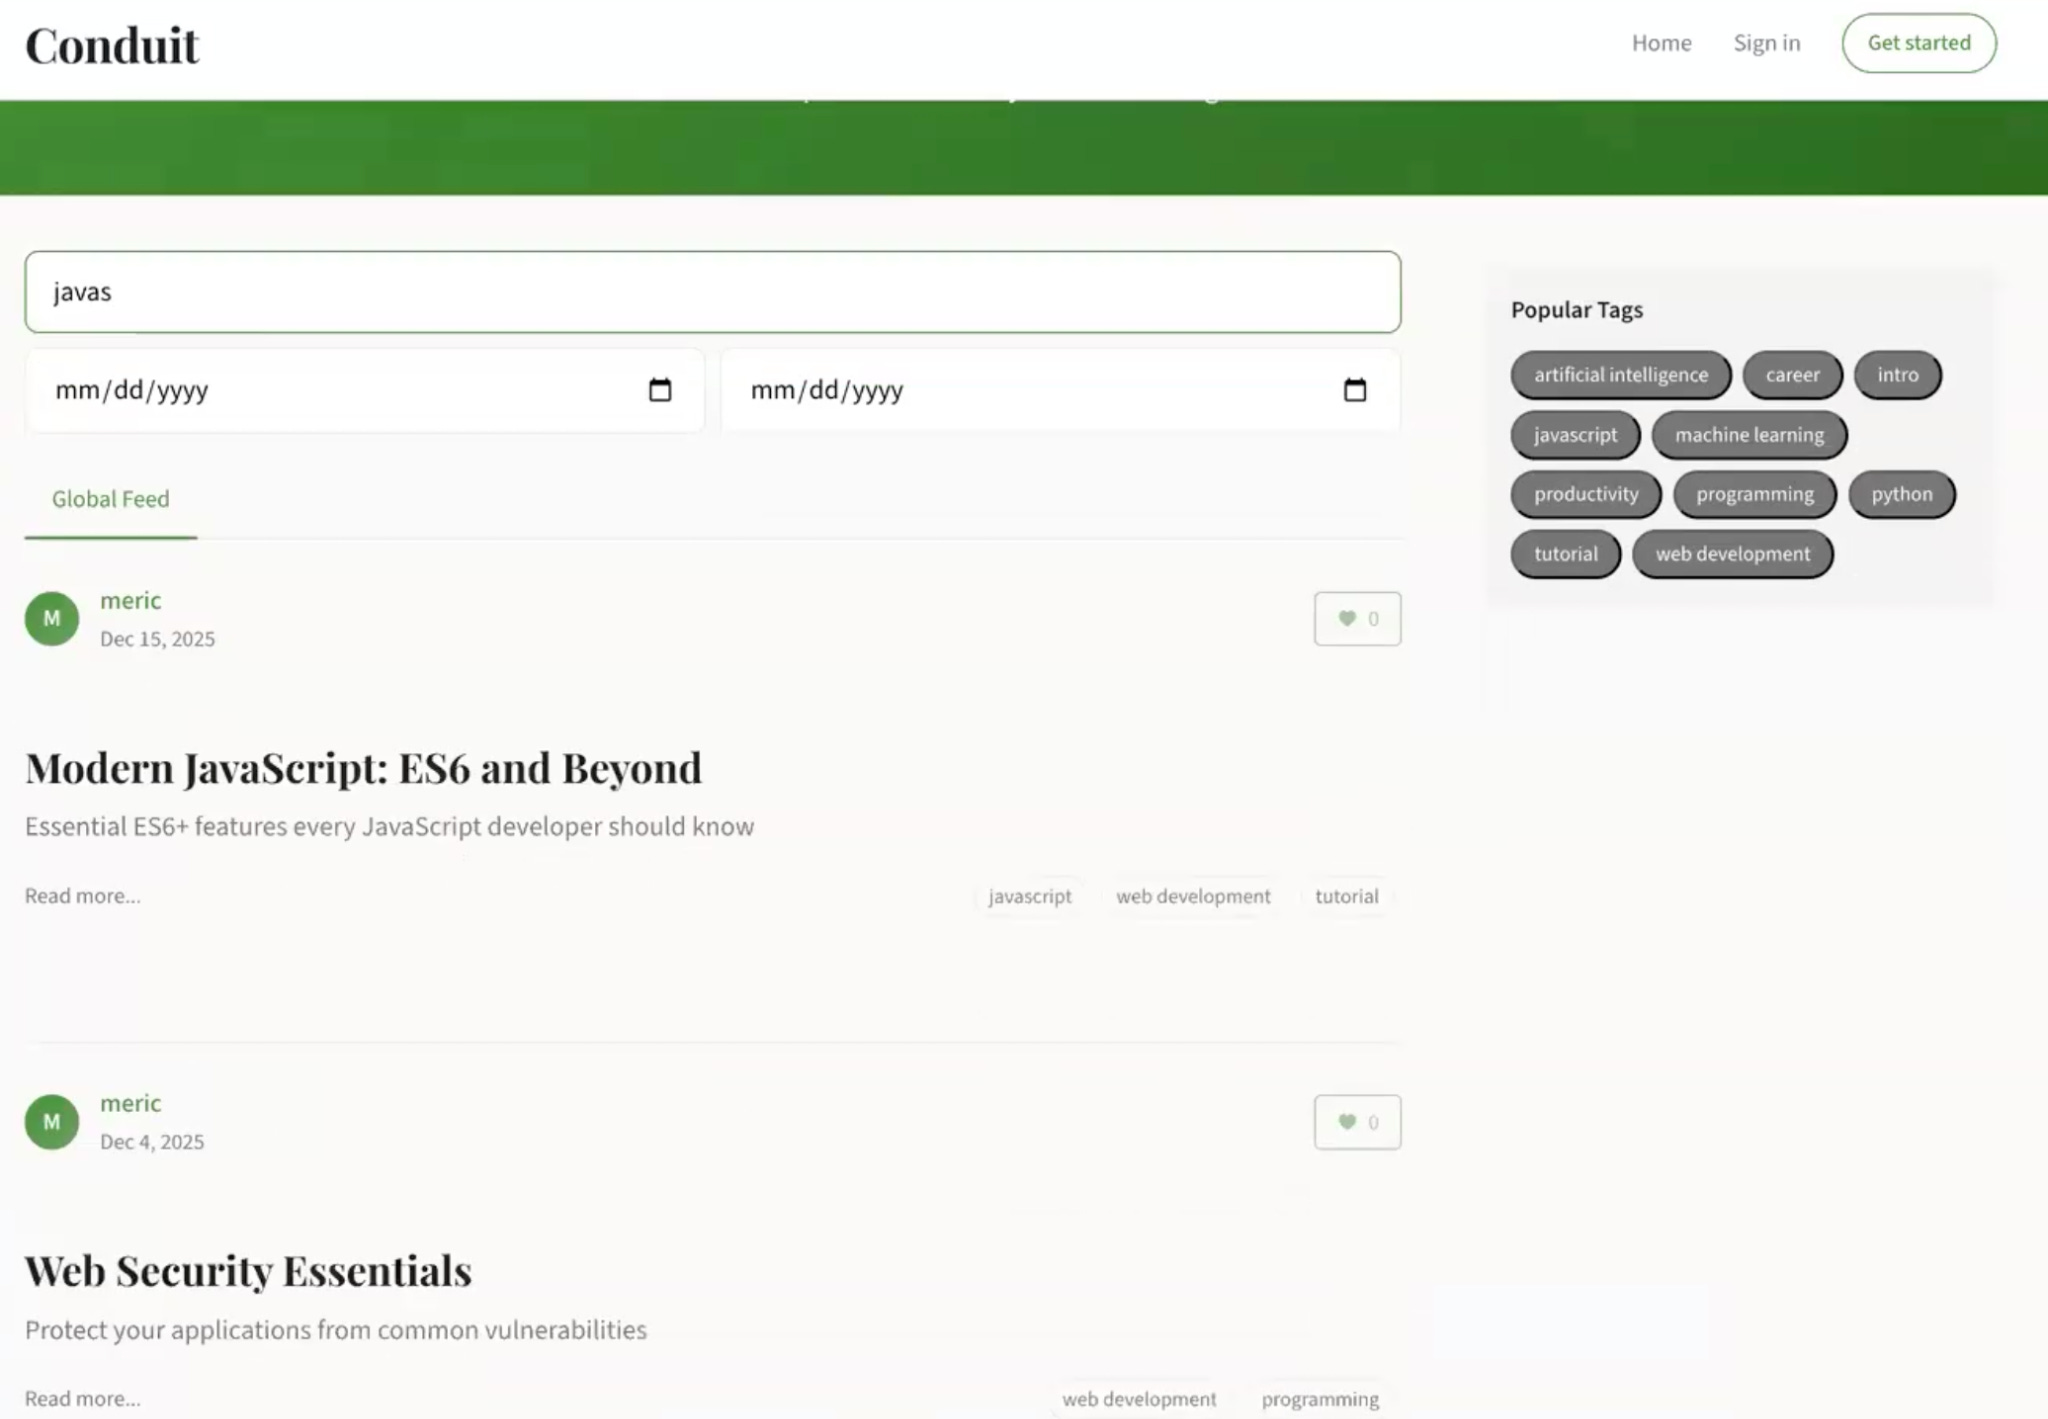
To make this concrete, let’s take a vibe-coded Medium clone called Conduit, and the task of extending it with a new article search feature.
Step 1: Research the codebase
The first step is research. Before any feature gets discussed or any solution gets proposed, the LLM needs a high-level understanding of the codebase it is about to work in, similar to a new developer being onboarded to an unfamiliar codebase.
The research prompt, which can also be implemented as a slash command or skill, asks the model to read through the codebase and document what is there, covering major design decisions, file layout, tech stack, dependencies, and how things are structured. There is no mention of the feature you want to build, and no recommendations of any kind. The artifact from this stage is a research document, usually somewhere between 100 to 300 lines of Markdown, describing the state of the codebase as it currently is.
This document does two things at once. It onboards you to parts of the codebase you have not written, and it gives the LLM the high-level structure it needs to reason in later steps. It also keeps the context window manageable, since you cannot feed millions of lines of source files to the model without blowing past its limits, and most of that detail would not be useful anyway.
Sometimes the analysis has to go outside the codebase too, because libraries evolve and a model trained months ago may not know the current state of a package you depend on. Context7, an MCP server, handles this by pulling the latest external documentation for libraries the codebase uses, and you can force it to re-index a repo if you know it has changed recently. For rapidly evolving open-source packages or domain-specific repos, this is the difference between accurate analysis and outdated assumptions.
One thing worth being deliberate about is that the research doc is not persisted in the repo, and you run it fresh every time you need it. As LLMs get faster and cheaper, an on-the-fly analysis will always be more accurate than a stale cached document, and you avoid the maintenance problem of keeping the doc in sync with a codebase that keeps changing.
Once the document is generated, read through it carefully. This is where you put yourself in the loop, going through the model’s understanding of the codebase to see what makes sense and what does not. If a section feels thin or you do not fully follow what the model has written about a particular piece, ask it to expand on that part before moving on. The research stage is the cheapest place in the framework to clarify things, because that understanding is going to seed every step that comes after.
The principle behind this step is that it is descriptive, not prescriptive. The LLM is documenting what exists, not recommending what to do, which means this is largely a sanity check on your end. The prescriptive steps come next, and that is where you have to slow down and pay closer attention.
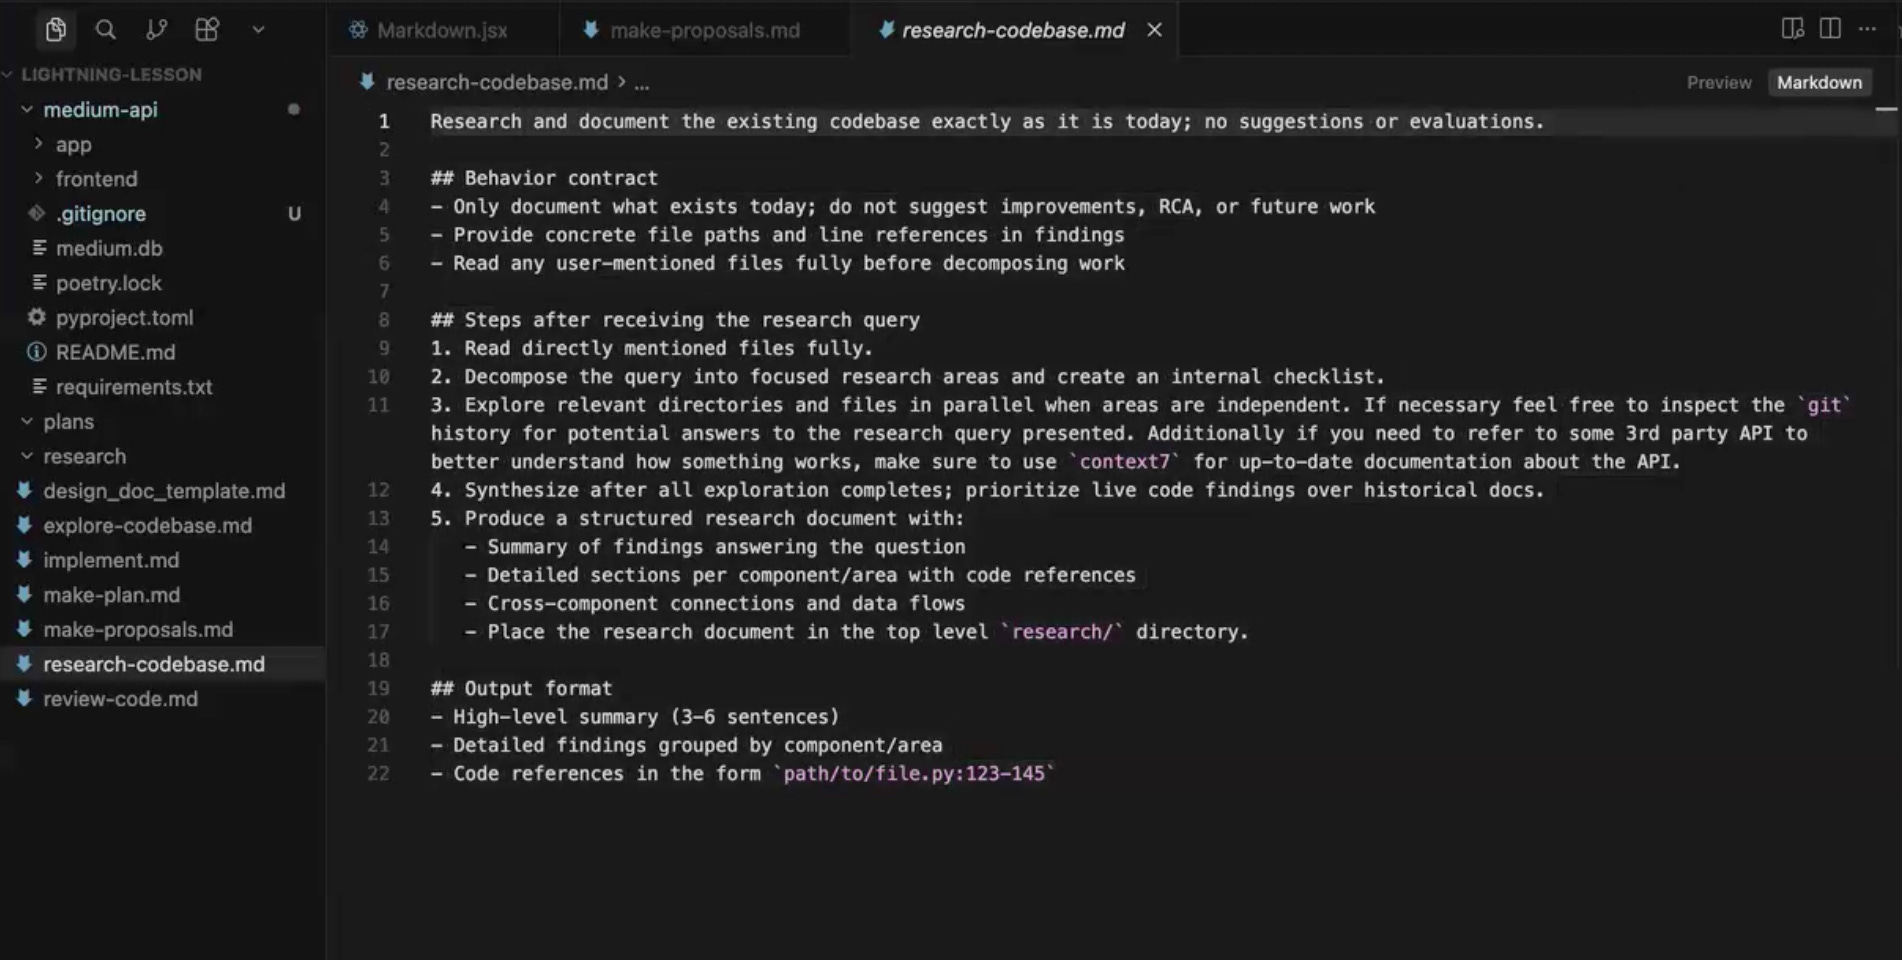
View research-codebase.md in GitHub
Step 2: Propose solutions
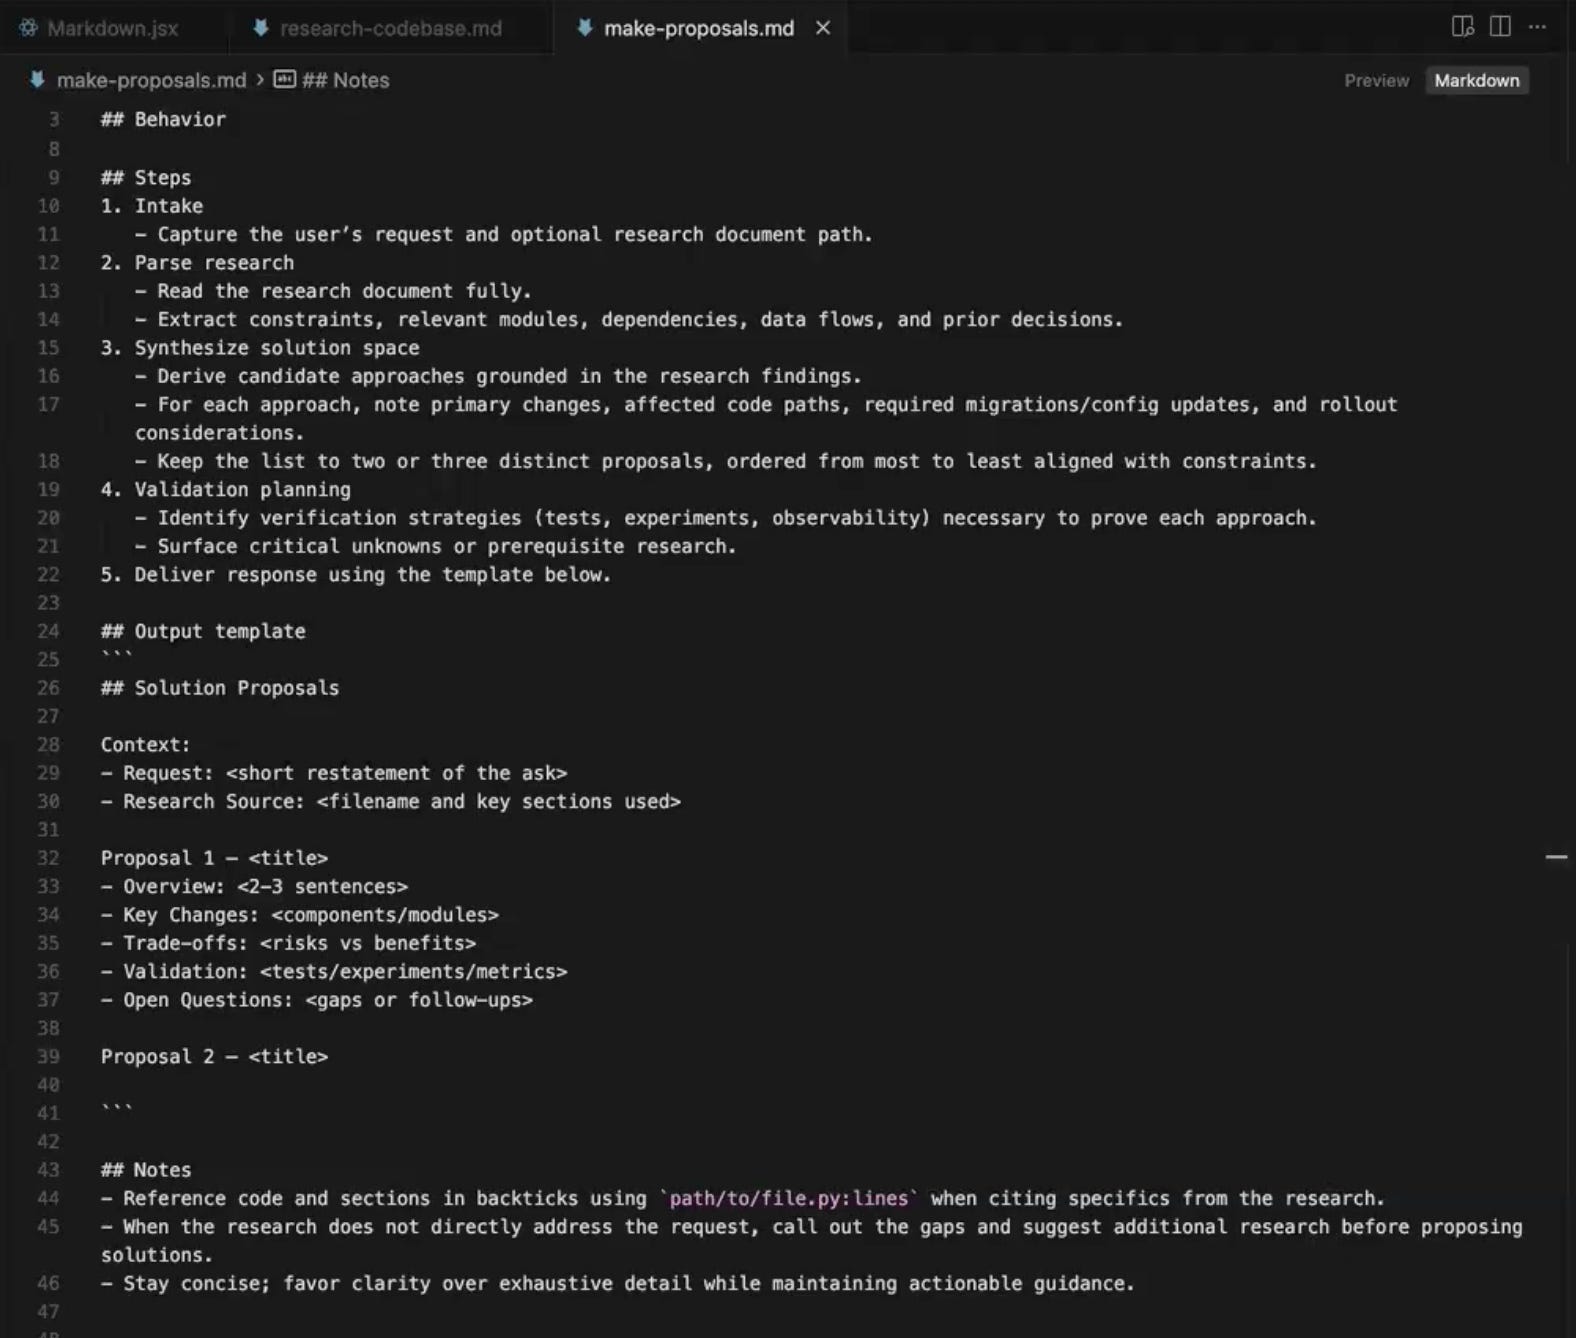
With the research document in hand, the next step is to actually start tackling the feature. The proposal prompt takes the research doc as input, along with a description of the feature you want to build, and asks the LLM to come up with two distinct proposals for how to implement it.
The prompt asks for two proposals specifically. You could ask for three or four, but in practice the third and fourth options tend to be minor variations on the first one and the output starts getting repetitive and noisy. Two is the sweet spot, where the model has to commit to genuinely different approaches and you have something meaningful to compare.
Each proposal comes back in a structured format covering the overview, key changes, trade-offs, validation strategy, and open questions. The format matters because it makes the proposals scannable. You should be able to read through both and quickly understand what is being suggested, what the gives and gets are, and what the model itself is uncertain about.
For the Conduit search feature, the two proposals that came back were a SQL ILIKE search that was database-agnostic and required no migrations, and a full-text search using Postgres-native TSVector with an Alembic migration to set up the index. Two genuinely different approaches with different trade-offs around scale, performance, and operational complexity.
This is also the first prescriptive step in the framework, which means the LLM is no longer just describing the codebase, it is now making recommendations about what to do with it. Your job changes accordingly. The research stage was largely a sanity check, but at this stage you have to step into a tech lead role and actually evaluate what the model is proposing. Does it handle scale the way you need it to? Are the trade-offs acceptable for your application? Is the validation strategy actually going to catch the things you care about?
The back-and-forth happens here. You might ask the model to go deeper on a part of Proposal 1 that does not fully make sense, push back on something in Proposal 2 that feels like the wrong call, or even reject both proposals and ask for a third approach the model did not consider in the first place. Counterintuitively, when you do ask for a third option after going through the first two, the model’s reasoning on that third option tends to be sharper than if you had asked for it from the start, because it has already worked through the trade-offs of the alternatives.
You can also cherry-pick. If you like the data model in Proposal 1 but the API design in Proposal 2, you can combine them, as long as by the end of this stage you have committed to a direction. You do not need every implementation detail nailed down, but you should be clear at the high level on what kind of solution you are building, because the next step asks you to commit to it.
View make-proposals.md in GitHub
Step 3: Plan the chosen solution
Once you have committed to a direction from the proposals, the next step is to turn that direction into a detailed plan. The plan prompt itself is light, since most of the work is done by the design doc template the prompt asks the LLM to populate. That template is the real workhorse of this stage, and the more thorough it is, the better the implementation that follows.
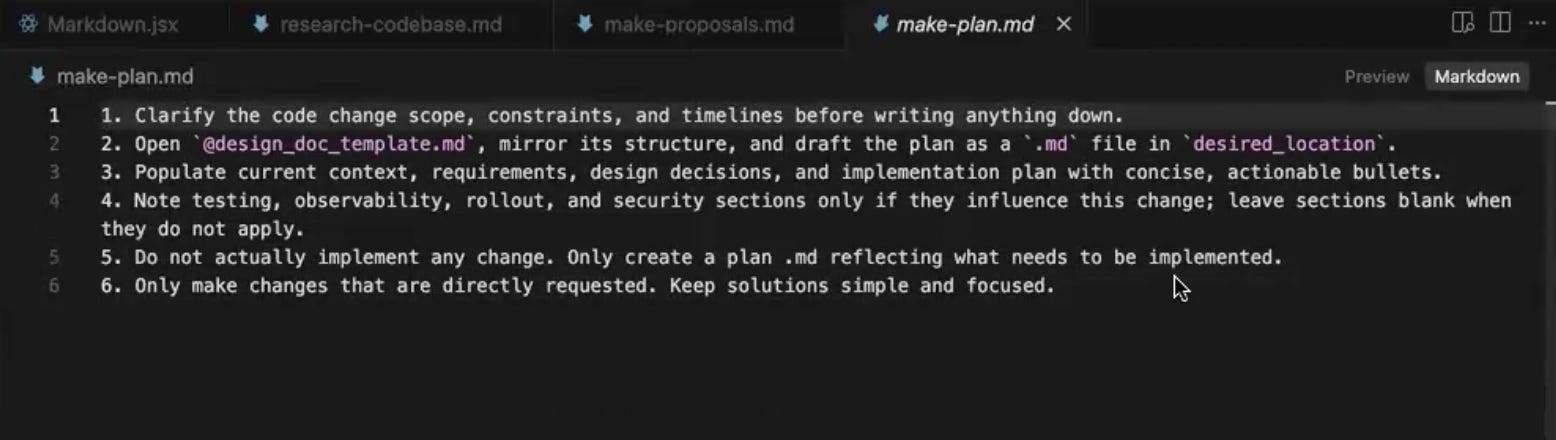
View make-plan.md in GitHub
The design doc covers a lot of ground. It starts with the current context, then moves into functional requirements, which are the things the feature must do, and non-functional requirements, which are the things that often go unspoken, like performance, scalability, and observability. From there it works through the major design decisions, asking why one approach was chosen over another and providing a rationale. The technical design section goes deeper, with data models, classes if you are writing Python, code snippets for the core pieces of the implementation, integration points, and an explicit list of which files are getting touched and which ones are not. The plan is then broken into phases, with a testing strategy and dependencies called out.
One section worth being deliberate about is the explicit out-of-scope list, the things you do not want implemented in this particular feature and are leaving for later. This often gets glossed over, but calling out what is not being built in this pass is one of the cheapest ways to keep the implementation focused and prevent scope creep in the next stage.
Unlike the research and proposal documents, the plan doc is worth preserving. It is also worth sharing with teammates before any code gets written. Reviewing a planning document is easier than reviewing a pull request, because by the time the PR is up you are looking at five or six hundred lines of code, which can be a lot to hold in your head as a reviewer. A planning document is in plain language and at the level of design decisions, which is the right level to catch problems early.
You may have noticed that most modern coding harnesses ship with their own plan mode, and the truth is that the prompts they use look very similar to what is happening here. You can use either one interchangeably. What matters more than which prompt you run is that you understand what a good design doc contains, so that whatever plan mode you are using is actually producing one.
One practical thing to consider before running the plan prompt: if you have done a lot of back-and-forth on the proposal stage, the context window is now carrying both proposals plus your discussion. That can confuse the model when it tries to write the plan. Clearing the context before the plan stage, so the LLM starts fresh with just the research doc and the chosen direction, can produce a cleaner output.
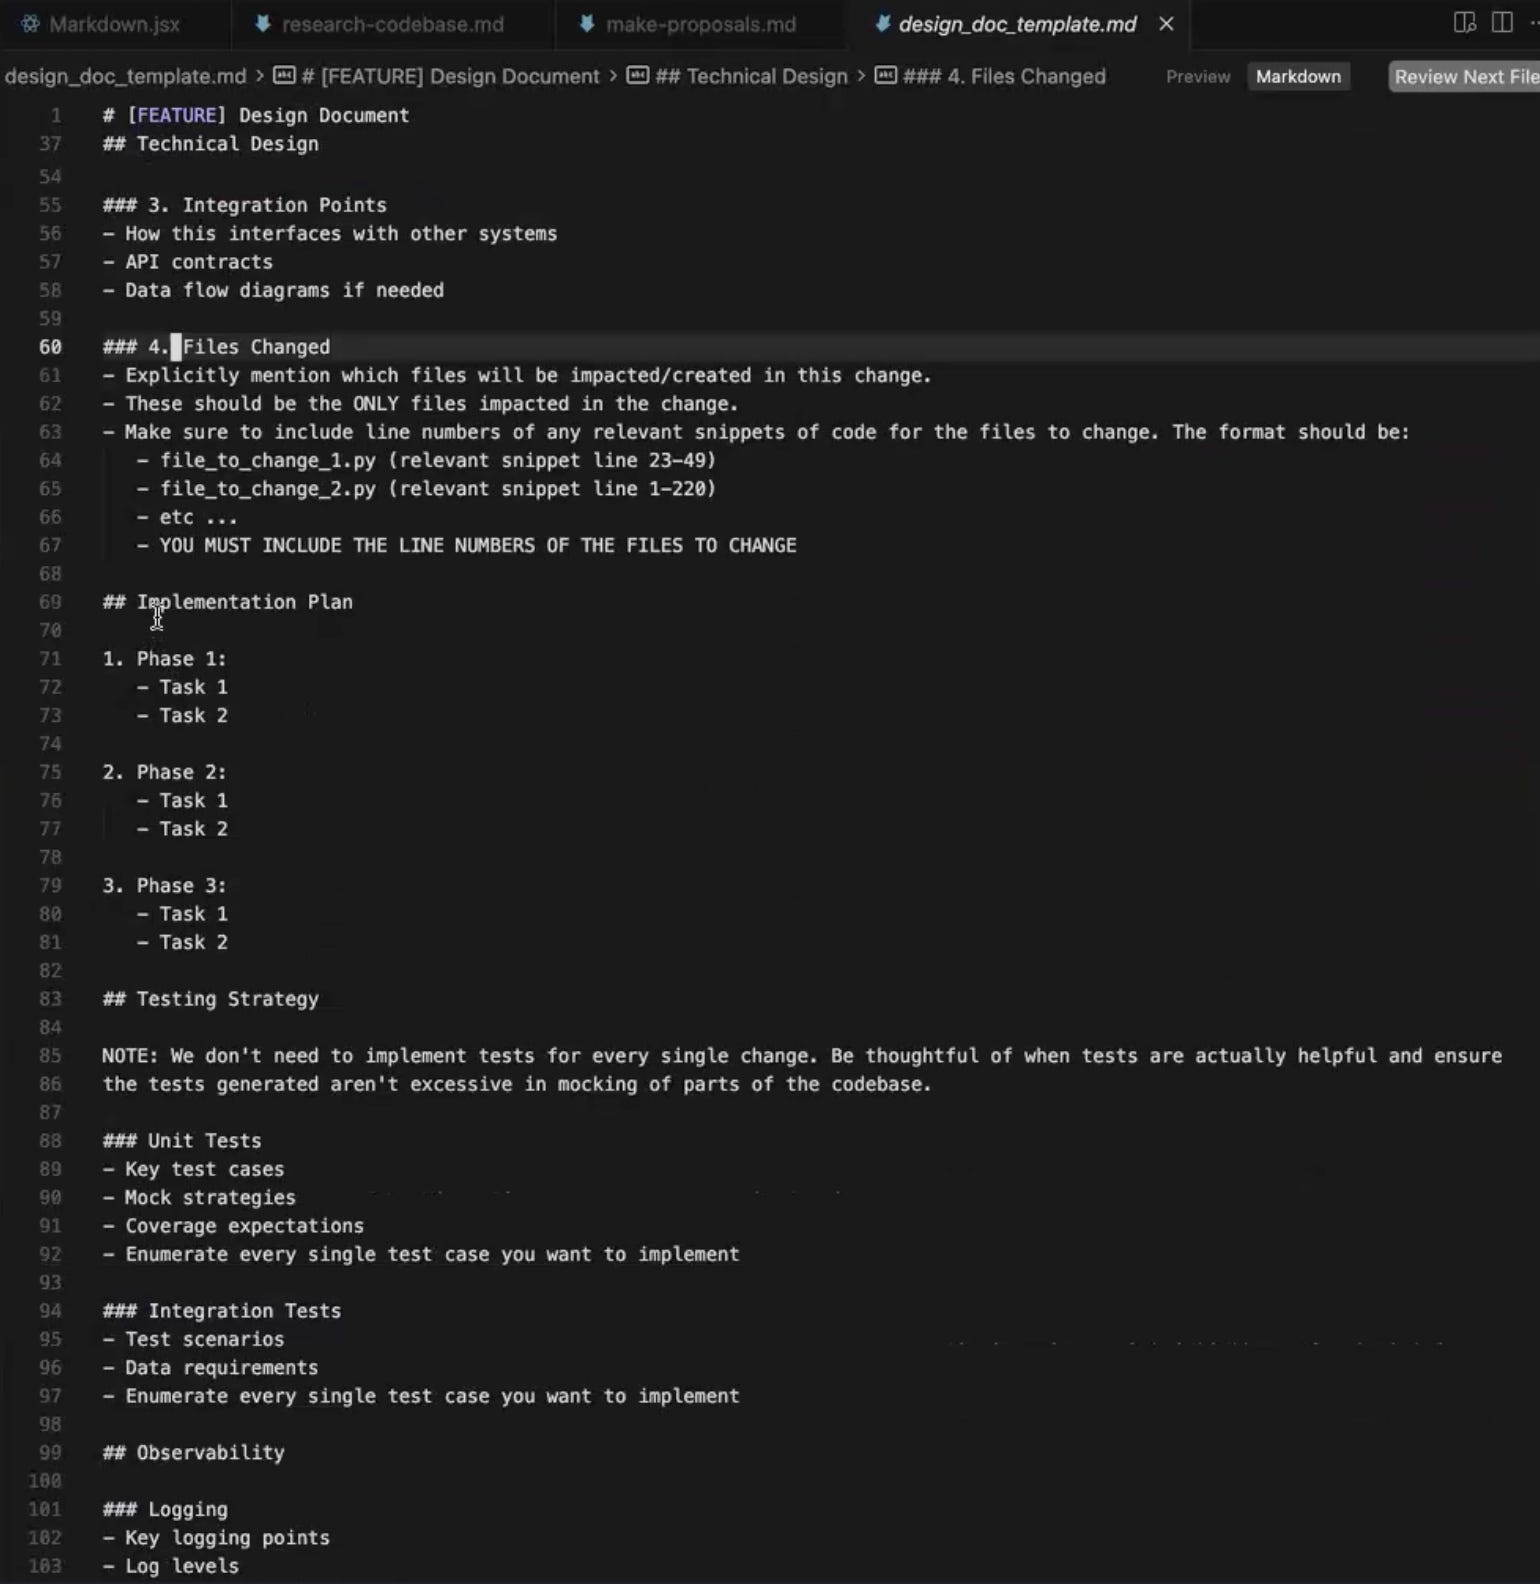
View design_doc_template.md in GitHub
Step 4: Implement the plan
By the time you reach the implementation stage, you have a research document describing the codebase, a chosen direction from the proposals, and a detailed design doc covering requirements, decisions, integration points, files to change, and what is out of scope. The LLM has everything it needs.
This is where the upfront work pays off. The implementation prompt asks the model to execute against the design doc, and because the spec is detailed enough, the model has very little room to guess or wander off in unexpected directions. In the Conduit demo, the implementation came back as a SQLite-based search that worked across both the article title and body in a single pass.
You can test that it actually works by searching for terms and seeing what comes back. A search for ‘JavaScript’ returned the articles that had JavaScript in the title or body, and a search for “cursor” returned two articles, one with “cursor” in the title and another that mentioned cursor.execute deep in the body, which confirmed the search was looking at both fields the way it was supposed to.
One alternative ordering worth mentioning here is TDD, where you write the tests before the implementation. That works just as well, and the methodology still holds. The point of REPIT is not the order of the last two steps as much as the discipline of having done research, proposals, and a plan before any code gets written.
Step 5: Test what got built
The final step is testing, which closes the loop on the framework. Testing here is broader than just running unit tests against the new code, and can take a few different forms including code review, integration testing, unit testing, and QA testing. Each one has different complexity and different levels of setup needed to run autonomously, but the principle behind all of them is the same: put the agent in a position where it can verify its own work before the work is considered done.
The form of testing demonstrated in the Conduit example is automated code review. A code review prompt is run against the just-implemented changes, and the LLM categorizes its findings into three buckets: things you must fix, things you probably should fix, and things that are minor enough to leave or treat as nice-to-haves. This gives you a quick triage view of what came out of the implementation step and where the rough edges might be.
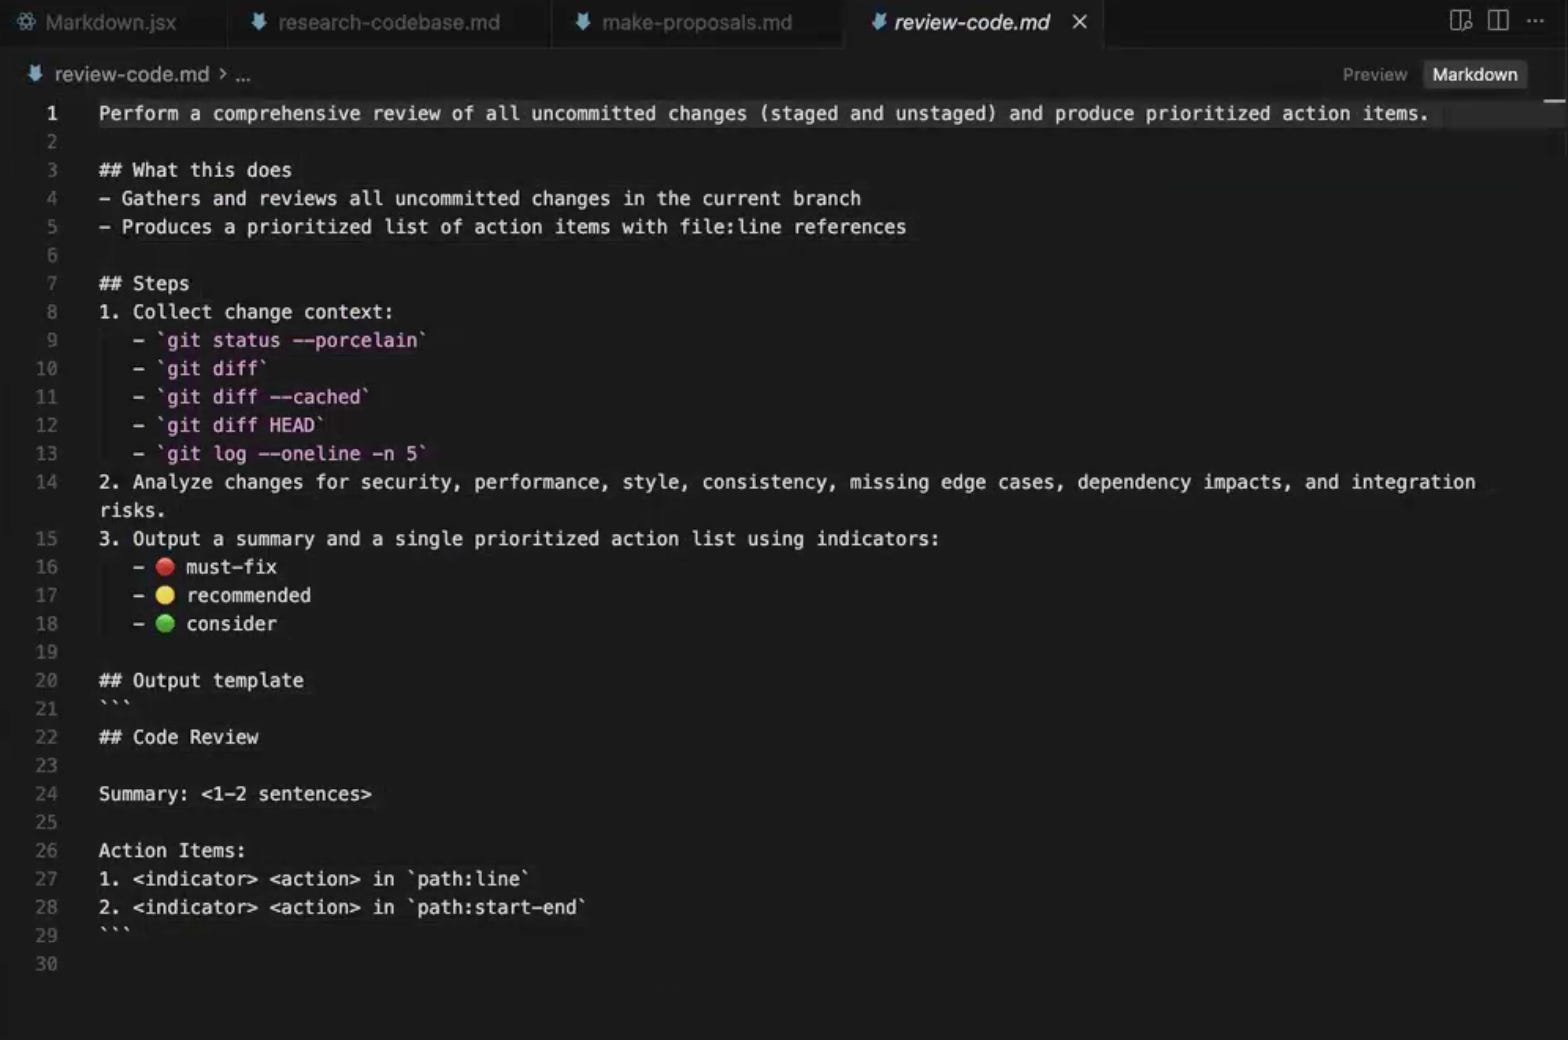
View review-code.md in GitHub
One thing worth being deliberate about here is to not use the same LLM instance that wrote the code to review the code. An LLM that just generated an implementation will rationalize its own decisions when asked to review them, because the reasoning that produced the code is still in its context. The review ends up being a defense of the implementation rather than a critique of it.
There are two ways to handle this. The stronger approach is to run the code review with a completely different LLM family or class, so a fresh model with a different training distribution evaluates the work. The lighter-touch approach is to use the same family or class but clear the context completely, so the reviewing instance has no memory of how the code was written and has to form its own understanding from scratch. Either works, but the principle is the same: the reviewer cannot be the same mind that wrote the code.
Most modern coding harnesses also ship with native code review modes, similar to the plan modes mentioned earlier, and you can use those interchangeably here. The same rule still applies though, since a harness running on the same model with the same context will still rationalize its own work. Clearing context or switching models is what makes the review independent.
Adapting RePPIT to your work
You do not have to hold yourself strictly to every single step in the most literal sense. Use the steps as guiding milestones, in the order that makes sense for the work you are doing. If you want to start with the tests before implementation, the framework still holds. If your domain needs an extra step at the end, like a security review for healthcare data, you can add it.
The thing that matters more than which version of the framework you use is the underlying principle, which is that you are being deliberate at each stage. You are giving the LLM a real understanding of the codebase before asking it to make decisions. You are forcing it to weigh trade-offs before committing to a direction. You are writing a spec before any code gets written. You are reviewing the work with something other than the same instance that produced it.
Try it on your next non-trivial feature, and refine the prompts over time the way you would refine any other code in the codebase. That is how 2-3X stops being a claim and starts being a number you actually hit.
This article grew out of a live Chai & AI session with Mihail Eric on shipping production code with AI. Mihail Eric is Head of AI at Monaco a startup building the future AI-powered revenue platform for GTM teams. He is also a lecturer at Stanford, where he created and teaches The Modern Software Developer, the world's first university course on AI software development. He also teaches a maven course on AI Software Development: From First Prompt to Production Code. These sessions happen regularly and they get intense. If you want in, subscribe to The Nuanced Perspective to get notified.